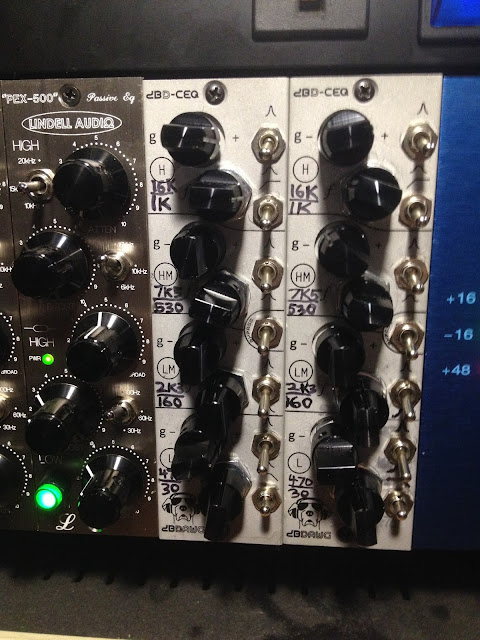
A few years ago, I saw this kit for sale, and eventually bought a couple on sale. They are no longer made, and the seller seems to be making motorcycle parts. If you are on the market for something like a Calrec EQ, there is the RTZ Audio PEQ-1549 which comes highly recommended, and the Gyraf Audio DIY project is still out there, which is probably what this DBD kit is based on.
Flash forward to May, 2017 and I have finally made the Mouser order, and put them together.
I started my hardware EQ journey with a pair of Lindell PEX-500 Pultec-style EQ which are pictured at the bottom of this post, and that got me hungry to get as many channels built as possible, so I finished the DBD kits. Really, for me, hardware EQ is the way to go, being much preferable to software equalizers. The same is true for compression, and next month I hope to start some Hairball 1176 for my mixing racks.
For a long time, I thought that rack gear was unneccessary for great audio. These days, EQ and compression, as well as things like spring reverbs and filters, seem just as important for my aesthetic as a good mic preamp or microphone. When you insert a high quality hardware tool onto a track, there's this effect of jumping out of the speakers, that I don't get from most software. Some things do come close, like the UAD SSL channel, etc. Those are the plugins to keep on the ready.
If there's an adequate patchbay setup, along with a lot of ADC/DAC I/O for external inserts, it's relatively painless to use hardware during a mixdown. The hardest part is setting up the racks and cables. Once that's done, the fun begins.
Building these kits was a challenge, taking me the better part of three days to complete the pair. There are a lot of parts to connect, and a lot of them are orientation specific, so some care is involved in getting it right the first time.
When I finished each one, I felt exhausted as if I had just performed some serious physical labor. I don't get that feeling from a fuzz pedal or whatever. A big PCB like this takes some time and effort. Lucky for me I had some Aphex Twin playing on my bluetooth stereo.
There were some less than perfect parts about these specific kits. The first thing I noticed were spelling and grammar errors in the build guide. My favorite one was the repeated use of "Resisters." That's 101 stuff, Jason, LOL. But I do have to give him credit for a nice front panel design, and a good PCB layout.
I had to add my own Sharpie markings for frequencies for each band. Somewhat bafflingly, the CEQ kits come with zero information other than "H, HM, LM, L" for frequency markings on the panel. To me, this is unacceptable so I consulted the original Calrec panel for clues. This put me off building these for a while. My confidence did increase during the build.
Until the awful part of attaching the pots and front panel. The pots don't sit flush to the front of the PCB, and there is no guide to get a proper right angle so the card sits flat in a 500 rack. The first build was ugly, I had to super glue some washers onto the pots to get a close-enough right angle, and to keep the small blue pots from being destroyed. On the second build, the nightmare fuel got to me enough that I used a square rule to check my angle before soldering the pots, which are also how the panel is mounted. I would have much preferred something like the CAPI kits where there is a mounting bracket with standoffs that holds everything together, and with the proper geometry. This was the main setback for this kit.
Another small setback was some of the solder pads were painfully small. The 100n caps in particular, the square pads that connect them to the ground plane are so small and odd that they barely attract the solder away from the legs of the caps. I had to use my flux pen, and some careful soldering technique, to get a proper joint on these 29 components. It wasn't pretty, but I made it work. Bigger solder pads could have solved this. And for some reason, I needed a lot of flux pen action for these PCBs. Which is something I've hardly used before in other projects. I don't know how to explain that. It seems like these might be bypass caps for the op amps, which is a nice touch.
Lucky for me, both EQs worked right off the bat, thanks to meticulous assembly. And the happiest thing I can report is that they do sound excellent, and I've really enjoyed using them so far. It feels like a game changer to be getting into more complete hardware mixing. I've been effortlessly getting some classic kind of tones by twisting these little knobs. Which is also really fun. By the end of the week my 500 series rack will be full, and that's a happy place to be. I'm already planning the next one.


